United StatesIt appears that you are currently in United States.
Confirm
Select a different country

Esthetic metal ceramics with VITA VMK Master®

It's easy if you know how: How to achieve optimal results

By Jürgen Freitag, Master Dental Technician

As Jürgen Freitag, Master Dental Technician (JF Dental, Bad Homburg, Germany) knows from decades-long experience, "Aesthetic perfection is the result of combining innovation with tradition". Besides working with state-of-the art materials and CAD/CAM technology, the veneering expert, who specializes in highly esthetic prosthetic solutions, also values the benefits of metal-ceramic restorations. This allows him to combine the best of both worlds and offer his customers excellent results.

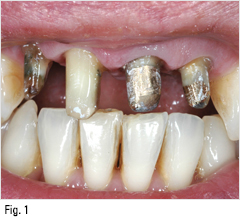
What I value most of all is the versatility and the great esthetic potential of metal ceramics, especially that of VITA VMK Master. For certain indications, such as discolored stumps or attachments, I even prefer solutions with metal substructures to those made of zirconium dioxide. A good example of this was the case of a 35-year-old female patient who presented with severely discolored stumps that required masking (Fig.1). With an all-ceramic solution the grey shade of the discolored stumps would show through the veneer, making it a good case for VITA VMK Master.

The case described here is a standard case with a seemingly low potential for achieving a spectacular result. These standard cases, however, are often the very ones in which visibly beautiful results can be achieved with relatively little effort. The secret of success lies in concentrating on the essential: the shape, the color and the surface quality.

The substructure: provides support and masking function

For manufacturing the crown copings I rely on CAD/CAST - a method that allows me to combine the advantages of state-of-the-art CAD technology with the benefits of the well-developed vacuum assisted high pressure die casting procedure. The substructure is designed on the monitor, milled from wax blanks in a milling unit, and the object subsequently sprued. The modellation is then invested and cast. This method results in a defined wall thickness of 0.3 mm after finishing, which also saves considerable time and offers a clear economic advantage: the value creation is kept in the laboratory instead of being diverted off into outsourced fabrication.

I like using high gold content PFM alloys on account of their warm, golden-yellow color, as they harmonize very well with the high-melting VITA VMK Master ceramic. Before veneering, the substructures are shortened by around 2 mm on the vestibular side to accommodate a ceramic shoulder.

Fig. 1: The situation before treatment with 4 anterior stumps: 12 darkly discolored, 11 light colored on the labial side, 21 and 22 with metal substructures.

Layering with a system

The VITA VMK Master ceramic offers not only top processing and modeling properties, but also simple handling and a minimum degree of shrinkage. Furthermore, the wide range of additional materials satisfies even the most challenging demands regarding the individualization of complex restorations. The esthetic results are equally convincing on the model and in the mouth of the patient.

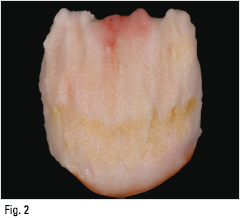
Fig. 2: A DENTINE layering scheme with OPAQUE DENTINE, DENTINE, CERVICAL CE3 (golden yellow); in the central portion of the incisor DENTINE MODIFIER DM3 (yellow); in the approximal portion of the incisor DENTINE MODIFIER DM1 (white).

The use of seven or eight powders for a usual layering technique may seem complicated to a less experienced user. Once the user has internalized the method and its logic, it will, however, become clear - given a thorough analysis of its characteristics - that it is hardly feasible to achieve an entirely natural appearance with fewer powders. Furthermore, with the highly esthetic restoration, the user has an effective price distinction compared to a monolithic all-ceramic restoration.

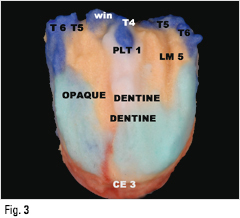
Fig. 3: Final layering for the first firing with EFFECT powders. CERVICAL CE3 (golden yellow); TRANSLUCENT T4 (neutral), T5 (light blue), T6 (blue); WINDOW; PEARL TRANSLUCENT PLT1 (pearly-cream); LUMINARY LM5 (light brown).

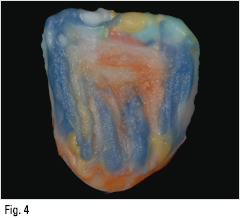
The example of the crown on tooth 11 in Figs. 2 to 4 shows the VITA VMK Master materials used up to the first firing. To make this easier to visualize, the ceramic powders were dyed with food colors. The colors indicated in the photo captions, however, do not correspond to this coloration, but reflect the effective color character.

Fig. 4: Palatal enamel layering scheme with ENAMEL, TRANSLUCENT T1 (whitish) for the enamel ridges, PEARL TRANSLUCENT PLT1 (pearly cream).

A convincing result

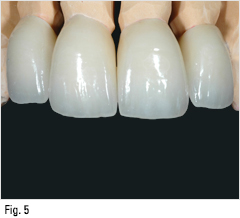
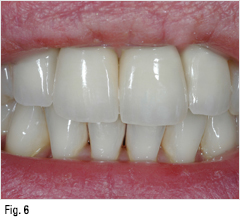
The crowns already show a good result at the glaze firing (Fig. 5). After the final manual polishing, the materials display their natural appearance and an esthetically convincing end result: achieved through harmony of color, shape and surface quality (Fig. 6).

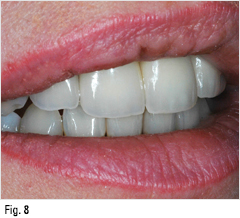
If one disregards the shade and the individual effects obvious at first glance, it becomes evident that the natural effect of these four crowns is essentially due to their shape and their surface quality (Figs. 6 to 8). The mirrored enamel ridges in the interproximal space between the central incisors, for instance, add corporeality to both of the teeth, thus enhancing their single-tooth character. The light reflections refracted on the manually reworked surface are furthermore characteristic of a surface texture that bears a closer resemblance to a natural tooth than could be achieved with a glaze firing. Perfect results such as these can be achieved with VITA VMK Master.

Fig. 5: Metal-ceramic crowns on the saw model after the glaze firing.

Fig. 6: Perfection in shade, shape and surface: the pronounced translucency of the incisal area is easily recognizable, and thanks to the metal substructure, the discolored stumps and the opaque do not show through. This also shows a very good match with the adjacent teeth and the lower posteriors.

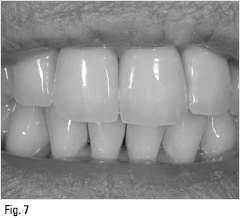
Fig. 7: After the final manual polishing, a black and white image is helpful when checking the final shape; in this way, even slight deviations in the form and degree of lightness can be better visualized, and therefore easier to assess.

Fig. 8: Lateral view from the right: in particular, the translucent incisal margin on the crown on tooth 22, and the natural appearance of the mamelons on the central incisors are clearly recognizable. Neither a metal substructure nor the opaque shows through.